"I don't think so Tim"
It's been a very long time since I've updated this. Shortly after my last post I ended up moving from Boston to western Connecticut and sort of got out of the habit. However, I just completed a quilt project that has been almost 4 years in the making, so I think it's time to blog about that one.
The house I purchased when I moved has an interesting history. The original house structure was a small cottage with a screened-in porch out the back. By small, I mean about 300 square feet. My property is on a hill overlooking the upper end of Lake Zoar, essentially in a bit of a gorge. Because of the slope, the screened-in porch is up a story (on stilts) and the basement was a walk-out in the back.
In 60s, an addition was added that tripled the size and made it into a real house. When the owner died at age 99, the house was purchased by a younger couple who put a lot of effort into renovations. One of the renovations was a complete redo of the living room/kitchen area by knocking out the porch wall and adding that square footage to the kitchen. The resulting kitchen was gorgeous, and one of my primary reasons for picking this house when I moved.
One consequence of this remodeling was windows. Because the kitchen sticks out the back of the house (in stilts, no less), it has windows on 3 sides, with an eating area in the most well-lit portion at the end. There are a total of 10 windows in the kitchen area. Here's a picture of the kitchen from the real estate listing.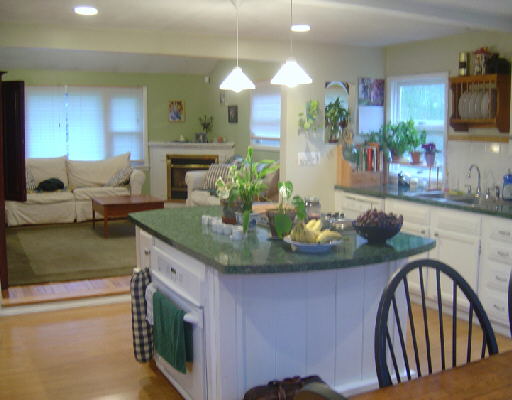
When I first moved in, I had no idea as to what I should do for kitchenb window treatments. kitchen. This was going to require a little thought.
During this process, I realized that making my own window treatments could be an option since I do know my way around a sewing machine. I started checking out books on how to make shades, blinds, etc, and stumbled upon the following book:
Quilted Roman Blinds
Bingo, we had a winner! And as a bonus, the author has a wonderful website and sells all of the necessary hardware necessary. I had every thing I needed, including the inspiration, so it was time to get to work.
Of course, doing one quilt design and repeating it nine more times wouldn't work for me. Making more than one version of a quilt gets boring in a hurry. I was going to need to make blinds with ten different designs...and my normal color wheel batik fabric selection was pretty much a given.
The first steps were to design the layout of the quilts, since I wanted the interior portions to be the same size so that the borders would look similar even though all of the quilts would be dramatically different. I played around with layouts in Electric Quilt, and decided that the borders would have a wide border, with a narrow black border that framed the inner pieced area. By tweaking the border dimensions, I ended up with an inner pieced panel that would be 28" by 42". This meant it could be created using a 4x6 grid of 7" inch blocks or a 2x3 grid of 14" blocks. A block size of 7" or 14" wasn't the most ideal of situations, but I could work with that. I also realized some of the designs would likely not use a grid layout at all, since from day one, I knew that one of the blinds would be a french braid layout. But for the most part, I was going to let things get created as I was inspired.
I'm not going to go into many details of the individual blinds in this blog post. I'll likely do some additional posts where I talk about each one in turn. Many of the blinds were created during quilt weekends at the Henry Farm Inn in Vermont. These resulted from projects prepared by our instructors Anne Gallo and Susan Rabin of Yankee Quilts. They'd present a project idea, and my first thought would generally be "can I make this in a 28" by 42" size". If the answer was yes, well, more more blind closer to completion. Five of the ten blinds were created this way. Two more of the blinds were based on quilts we'd done in prior classes with Anne and Susan and the french braid design was a idea I'd come up with during the class I've already blogged about where I'd played with different braid variations. So Anne and Susan contributed to all but two of the blind designs.
Steve Martin had an old routine about how he could teach you how to make a million dollars and not pay any taxes. Step 1: make a million dollars. This blog entry is going to be like that...to make ten different quilted blinds, step one is "make ten different quilts". This took several years, and will be a topic of its own (I promise). For now, I want to focus on the journey involved in completing the project, which really happened over the course of the last year.
Ok, I've got ten different quilt designs (ok, I actually made 12, but 2 of the 12 I decided weren't going to work as part of the blind sets). The next step was going to be getting the borders on all of the panels so that they would be out to full size. A year ago, I had the opportunity to drive from CT to Nebraska with my Godchild to take her back to college. We drove because she was going to be taking a car back with her on this trip, and I flew back. While in Nebraska, I would be visiting with my friend Marcia (who introduced me to quilting originally). I was going to be there for a week, but Marcia and her husband would be working most of the week, her kids started school that week, so they wouldn't be around. So I packed my blinds, the border material, and took over Marcia's sewing room for a week.
Early on in this process, I had planned on using two different colors for the blind borders. I had picked a spotted batik that was available in 2 different color ways. I had figured that 3 yards of each was enough to do all ten blinds, and had purchased this fabric before I even had a single blind pieced.
Fast forward a couple of years. I'm now figuring out how to cut the border fabric and discover that I have enough border fabric for just four of the blinds! The instructions for creating the blinds has seams and excess fabric to allow the blinds to be squared up, so my original calcuations based on the finished size of the blinds did not work out. Shazbot!
Oh well, this meant it was time to do some fabric shopping. Marcia and I hit a couple of Nebraska quilt shops looking for border alternatives. I had pretty good luck at the Quilted Moose and the Cosmic Cow. My original plan for using two different border fabrics got expanded to five different fabrics, two in each color. In retrospect, this was an excellent improvement, as I was able to select a border that best enhanced each of the individual designs.
Ok, crisis one adverted...now on to crisis two. In order for these blinds to look like part of a set, it was critical that the borders be precisely the same size on each blind. Since they would be hanging next to each other, the borders, particularly the top and bottom borders, needed to match up or this whole thing would just look strange. Unfortunately, with a lot of the variations in design and the number of pieces, several of the panels ended up smaller than the critical 28" x 42" dimension. Six were fine, but 4 were definitely undersized. After a little bit of playing, I decided to add an additional border inside the black border to bring this up to full size. This worked really well, and in fact, significantly improved the overall appearance. In a wonderful bit of serendipity, 3 of the undersized panels used black elements in the design. These black pieces would have connected with the black border in ways that would have created some undesirable effects. By creating a little separation between the design and the black borders, the black elements really pop out instead of being absorbed by the border.
Ok, after a busy week in Omaha, I had a complete set of panels and borders done and ready for the Thermosuede backing to be added. Last fall, my good friends Ken and Cindy decided to have some "sew in" days over at their place. We just disappeared into their basement and sewed for the entire day. They have some large tables in their sewing room that are great work areas for working with large pieces of fabric, so working at their place was ideal for finishing up the borders.
On the first weekend, I steam ironed the thermosuede to preshrink it, and cut all of the pieces for the backs to size. This took most of the day, but now I was ready to start sewing them on the next time we did one of these weekends. Several weeks later, I unfolded the thermosuede and discovered mold spots all over the fabric. Because I had folded up the pieces immediately after I had cut them, the left over moisture from the steaming process had allowed mold to grow :-( However disappointing this was, it was immediately topped by nasty surprise number two...the pieces were also cut to the wrong size! They were useless and I was going to have to do this over. I immediately hopped in the car and ran to JoAnns Fabrics to buy more thermosuede and started over. This time, I checked the cut size against one of the blinds BEFORE I had the complete set cut.
In December, my friends used some timeshare points to rent a condo on Cape Cod and invited me along. We took all of our quilting gear along and spent the weekend sewing. Over the course of the 4-day weekend, I got the backs sewed on and the velcro along the tops of the blinds. These were now in a state where I could hang them up in the kitchen, although without the lifter mechanisms.
My friend Ken and I spent a day adding mounting boards for the blinds. We used PVC exterior brickmolding for the boards and ran a single board across the tops of the windows. We ran into one of the quirks resulting from the remodeling job that converted the screened-in porch into a kitchen extension. The original porch was built with a slope to drain water away from the house. This slope is still in the floor, and and is also in the ceiling. Mounting a level board for the blinds highlighted just how much of a slope there was. Even the window frames were parallel to the floor!
Ok, with the mounting boards in place, I could at least hang up the blinds, even if I couldn't raise them. Since this was the dead of winter, that was not much of a problem.
Here is a picture of the some of the blinds just hanging loose.
From here, it was a "simple matter" of adding the plastic battens, sewing lift rings on back, adding the weight rods, mounting pulleys and adding the lift cords...how hard could that be :-)
Adding the plastic battens was a step I thought would be very hard, but turned out to be no real issue. The biggest difficulty was needing to wait about 3 hours for the fabric glue to set before the blind can be moved off of the work surface. This is no big deal if you're dealing with one blind, but with ten, it sort of stretches out the process.
The rings also were no real big deal other than the sheer volume of them. Each blind required nine rings. I was able to position the outside rings so they fell inside the black borders, so I only need to match thread color with the middle column of rings, which definitely sped things up.
Once the rings were done, I was really out of excuses for not pushing forward and completing the project. The next step was weight rods for the bottom of the blinds. You've got to love a quilt project that uses a reciprocating saw and a bench grinder (cue the Tim Allen caveman grunt)! The reciprocating saw cut through the steel rods like butter and the bench grinder did a beautiful job of deburring the rods. Much better than using a hacksaw and a metal file as indicated in the book.
Ok, the home stretch. Now all I had to do was mount the pulleys and add the cords. The first one was a serious pain, since I decided to do the window by the sink first. Since this was above a counter top, it was more difficult to access than the other windows. This was also the first one that used cords, and I had not yet established how long each cord needed to be....or the logistics of getting the cords threaded and tied off. This first blind really involved some creative use of profanity, in multiple languages :-)
After the first one, I did a run around the kitchen mounting the pulleys for the remaining blinds. This part of the process was not unlike doing calisthenics. "Raise your arms over your head, bend down to pick a dropped screw off the floor". I think I averaged at least one dropped screw per pulley. Nine blinds, four pulleys each, you do the math.
Holding the cordless drill over my head was no treat either. My neck and shoulders are so stiff this morning! Of course, being able to use more power tools was a bonus :-)
Ok, all I had left now is stringing cords, but the blinds were not going to go down easy. I strung the cords for the second blind, but when I raised it up, it didn't seem to be folding correctly. On inspection, I discovered I'd sewn the rings in the wrong batten positions...sigh. I clipped these off and set to resewing a new set. When I got to the last ring, I found I couldn't get the needle to thread because thread I was using was slightly heavier than the rest of the rings. I eventually gave up and found a needle with a larger eye. Got everything strung up and the blind still did not fold correctly! Cue the profanity in multiple languages again.
Turns out because I'd gotten interrupted on that last ring by needing to find a different needle, I'd managed to sew that last one back on in the original incorrect position. So I had to untie all of the cords one more time and resew that one ring. Fortunately, this was the only problem child of the bunch and shortly, the project was FINISHED! So, after almost 4 years and having the answer the question "Are the blinds up" countless time, it was done. It's amazing how nice the room looks with the blinds in the mostly up position and light coming through the windows. While they were just hanging there, the kitchen was mostly a dark cave. Fine in the winter, not so nice in the middle of summer. Here's a picture of the back wall with the blinds up:
And all of the blinds in full down, starting with the one by the sink:
The side outside wall of the kitchen:
The back wall with everything down:
And the other side wall that looks out on my deck:
Whew, a lot of work, and this has sort of kept me from working on other projects. I sort of have a plan for doing some blinds for my living room as well. It turns out that a quilt I've already made is almost the perfect size to cover the picture window in my living room.
This is done using my own hand dyes, but I need to think of something similar for the other window, which is a bit smaller.
posted by Rick McGuire @ 7:49 AM
10 comments
![]()
![]()


10 Comments:
They are all absolutely gorgeous!! I love the colors, and the variety of patterns.
Why ultrasuede?? Was it for warmth, as a sort of insulator in the winter??
Anyway, fantastic job you've done!! (you've inspired me . . .)
This is "Thermosuede", not "ultrasuede". Thermosuede is standard curtain liner material. It provides both insulation and uv protection to the curtain material.
OOPS!! Sorry, I mis-read that part . . . I was sorta thinking curtain liner material would be better suited, LOL!!
Funny, I saved your blog im my favs 4 years ago? LOL! So, I am cleaning out my Favs and wala! You are back :o) Your quilts are fabuous and I love your new home. There are so may inspiring blogs out there since 2005. I love to read them with my morning coffee. I can send you the links to some really goods if you want. Welcome back! Amie in Tn. :o)
Dude! Well worth the wait! Your window treatments are stunning. Hope this gets you back to posting and inspiring us quilter-bloggers.
Rick, your blinds are beautiful. This is something I had planned on doing for my greenhouse, but the greenhouse did not come to pass, will have to consider it for the studio instead. Great job.
Found out about you from Anthony Jones over on The Outlaw Quilters Guild on FB.
very ingenious! and what a way to show off your gorgeous quilts...from the Outlaw Quilters Group.
What an ingenious way to use quilts...and great way to show off your beautiful work
I am in awe of your color schemes as they are mine----jewel tones and brightly so which reminds me of me. Looks like I could just move right in and would be at home. Now how's the food/cooking? Do fries go with your shake? LOL
Oh my gosh! These are fabulous! The colors are perfect. I really can't say enough about it! Gorgeous!!!!!
Post a Comment
<< Home